Everything you need to know about silage clamp or silo bunker management

In a previous post, we discussed the importance of silage clamp or silo bunker design, which plays a fundamental role in obtaining quality silage. In this opportunity, we will talk about silage clamp management, how to work with silage storage, filling of the clamp/bunker, as well as where, when, and how losses occur, among other interesting topics.
Where do silage losses occur?
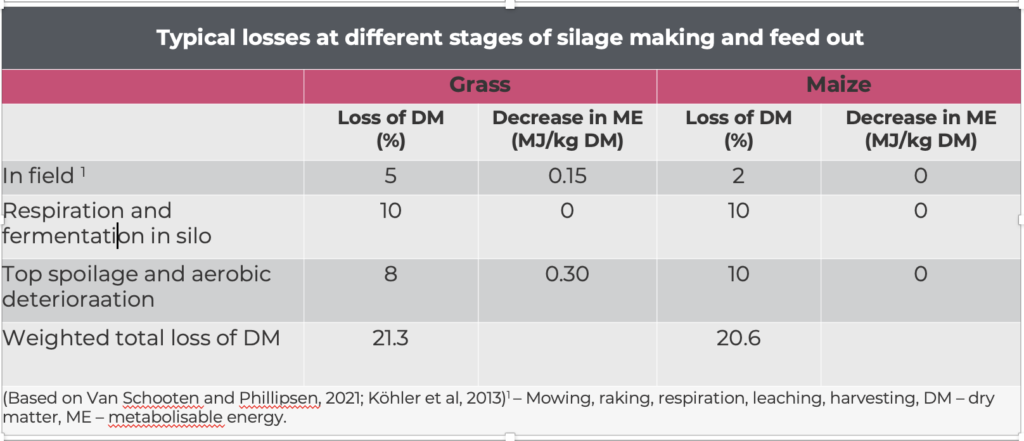
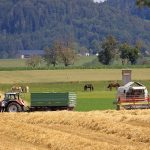
According to information provided by Will Wilson, silage storage specialist and Business Development Manager for ARK Agriculture in the UK, losses can occur even outside the silage clamp, for example, in the field where silage is lost because it’s not all picked up and collected inside the trailer.
However, most of the losses occur inside the silage clamp, hence the importance of having a good design that considers all key aspects, in addition to proper management.
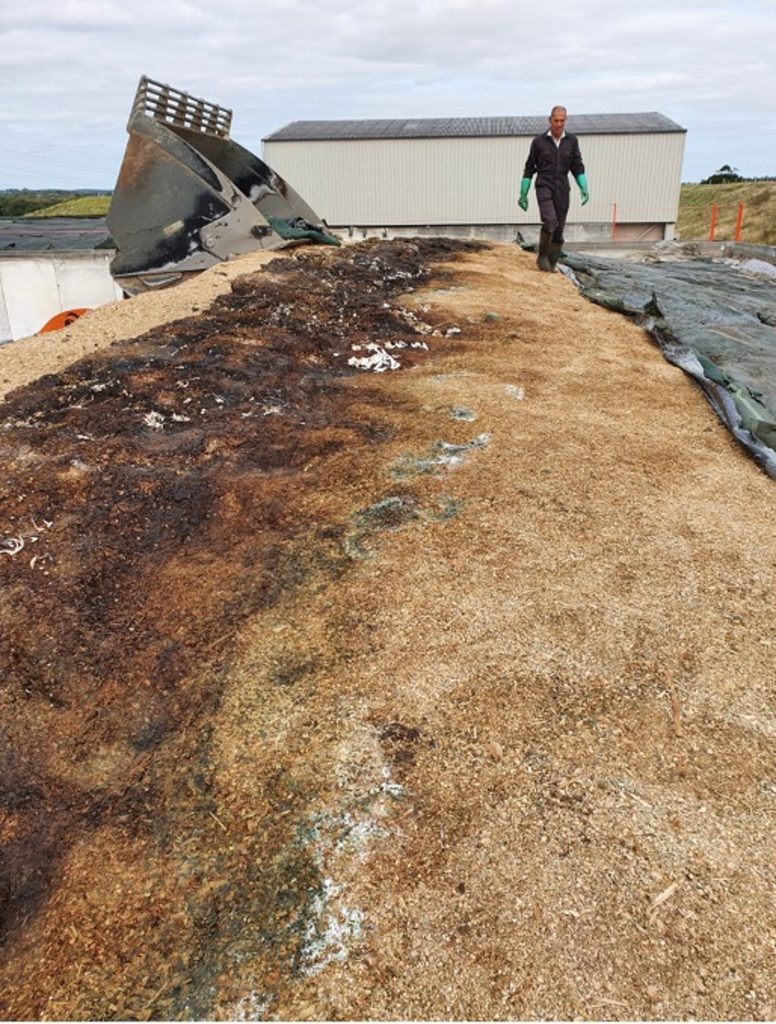
These losses outside the silage clamp can occur, for example, during the silage respiration and fermentation process which are very difficult to see (it could be produced by the natural heating of the silage) or when there is silage deterioration in the upper crust of the silage clamp which, can be appreciated because the silage looks black or moldy, and also due to aerobic deterioration.
These losses within the silage clamp are frequent particularly in grass and corn silage and can represent 20% of the silage clamp, which is a huge percentage considering the total bill paid in fodder or animal feed.
Source: Silage Clamp Management Webinar (ARK Agriculture)
The idea is to always consider the best practices during silage clamp management to significantly minimize these losses.
It is important to remember that the better the quality of the silage, the better the feed, in this case for cattle, and the better the quality of the products obtained, such as milk. In the case of biogas and anaerobic digestion (AD) plants, reducing these losses means obtaining more energy.
How to recognize bad silage?
First, farmers need to consider whether to hire the help of a silage and silage clamp management specialist. In this way, farmers can ensure that there is an adequate nutritional profile in the silage and that the processes are carried out in the best possible way, thus avoiding unnecessary losses.
Here are some aspects to consider:
- Measure waste in the silage clamp. This provides a guide for future planning and helps to identify faults in the silage-making process.
Measuring what goes into the silage clamp and what comes out or is obtained facilitates identifying the weak points, as well as the differences that may arise, which otherwise may go unnoticed, causing irreparable damage.
Sampling is always recommended, especially when dealing with anaerobic digestion plants. It is important to measure what is being purchased, how the dry matter is doing, the nutritional profiles inside and outside the silo bunker or clamp and pay attention to aspects such as bad odor, moisture, and excessive heat (the latter can be easily identified with a heat detection camera), as well as the presence of a brown color, as these are clear indications that something is wrong with the silage.
- Have a person responsible for managing and measuring silage quality to have better control of what’s happening. It is also a good practice to keep a schedule and a reporting structure to analyze the variables that have been appearing during the silage clamp management process.
- Hire a professional with scientific knowledge and the appropriate equipment to check the silage clamp regularly.
What causes silage losses?
The causes of silage losses can be diverse, some of them can be avoided and managed, while others will be almost impossible to overcome. Everything will depend on the climate where the silage clamp is located, the management of the silo bunker, and whether or not there is contamination in the area, among other factors that can directly affect the integrity and quality of the silage.
Some of the most common causes are:
- Bad weather during harvest, is generally difficult to avoid, as the weather can be very unpredictable at times. Monitoring what happens is ideal to make decisions about soil covers and clamp/bunker filling.
- Late cover. Once the clamp has been filled it’s essential to put the necessary covers to eliminate oxygen in the silage, and on the surface of the clamp/bunker as soon as possible, since the more exposed the silage is, the more exposure it will have to oxygen. The idea is to ensure optimum moisture levels, thus preventing the silage from being too dry, too exposed to oxygen, or getting wet when it rains.
- Contamination. It occurs especially when new silage is placed on top of old silage, as the latter will probably have started to decompose already, thus contaminating and affecting the quality and nutrients of the new silage.
In addition to this, it is necessary to check for debris in the fields, as well as mud or dead animals in the silage. Sometimes, animals cross the path of tractors and machines, and the remains go unnoticed and end up being stored along with the silage causing its imminent decomposition, contamination, and loss.
- Poor storage structures may result in silage not being stored properly. For example, it is necessary to ensure that the walls of the clamp that’ll be used for storage are well positioned to avoid instability or, in the worst case, falling.
Having a silage clamp in excellent condition will ensure that the silage is properly compacted and that it’s not contaminated by possible leaks that may occur.
- Poor compaction. Poor compaction results in difficulties in reducing oxygen in the silage and, consequently, silage quality may be compromised.
- Low quality or badly applied covers, in other words, using plastic covers that are neither an oxygen barrier nor heavy enough to stay in place.
- Damage caused by animals to the covers is uncommon, but it can happen depending on the area and location of the silage clamp/bunker, some animals end up creating holes in the plastic covers. This requires special attention as these holes can compromise silage quality.
- Untidy feed face occurs basically when rough edges are causing more surface area to be exposed to oxygen.
- Slow silage feed-out rate, an aspect that is often overlooked. The process of filling and emptying the silage clamp must be made as fast as possible, avoiding exposing too much silage to oxygen.
The silage clamp should be narrow enough so that the emptying rate can be between 1,5 to 2 meters per week. With this in mind, the perfect silage clamp should be 2 meters wide and 100 meters long to ensure a good feed-out rate, since the wider and shorter the clamp, the longer it will take to empty the silage and the slower the silage feed-out rate.
However, to have the perfect silage clamp there are many factors to consider. The rule of thumb to have that ideal balance of feed-out rate is to keep the silage clamp emptying process as fast as possible, without having to design silage clamps that are financially impossible to achieve.
In this sense, it becomes even more relevant to have an expert who can guide the farmer to design the ideal silage clamp depending on the specific requirements.
For more information on this topic, we recommend reading our article on Silage techniques and their advantages
We also recommend watching our webinar on Silage Clamp Management led by Will Wilson, where you will find more information regarding silage losses.
What about filling the clamp/bunker?
According to Will Wilson, the process of filling and compacting the silage clamp is the most important job on the farm, so it comes down to the teamwork between each farmer and the contractors.
In this case, both parties must understand the rules and follow them so that everything flows as smoothly as possible, knowing the risks of rushing things, not compacting the silage properly, or harvesting the fields too quickly without considering the minimum time required.
According to Wilson, there are some golden rules about filling the clamp/bunker:
- One minute per ton entering the silage clamp and per tractor.
- 1/3-1/4 of the weight entering the clamp/bunker per hour in machinery.
- Layers of 15 centimeters (or less).
- Never re-roll or re-roll already compacted silage.
- You shouldn’t harvest faster than you can fill the silage clamp, although this is a difficult thing to achieve because so many variables are involved. Ideally, the filling and compacting of the clamp should dictate the speed, not the harvester.
To learn more about these rules, and to understand each of them in more detail, we recommend watching our webinar on silage clamp management by clicking here.
What type of plastic film is recommended for silage clamp management?
According to Wilson, the best option for a silage clamp is to have an oxygen barrier film, which is a single-layer film that is placed on top of the silage.
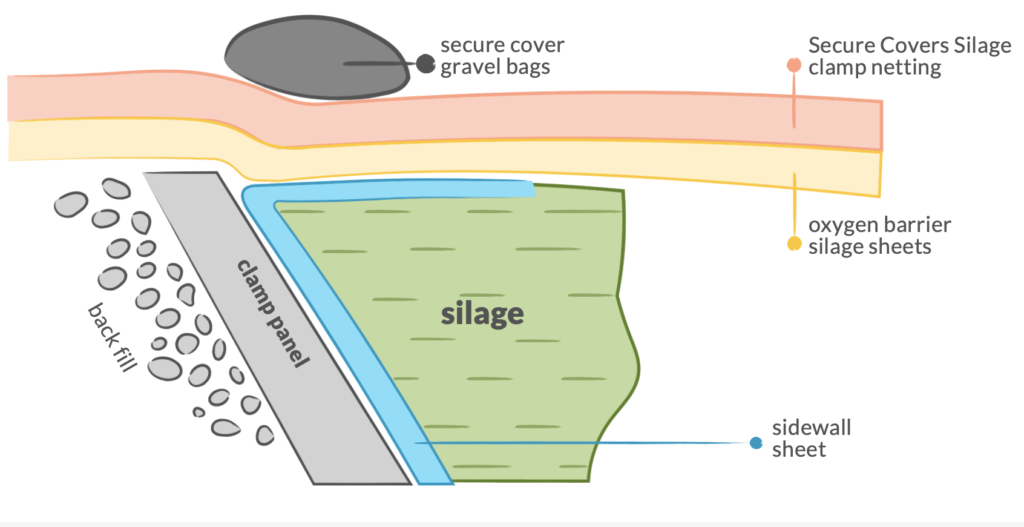
The ideal scenario is to have a wall in your silage clamp and, place a plastic sheet/film under the same. The plastic sheet should be placed 1 meter below the silage, and 1 meter above the silage, to create a gasket that protects the silage and prevents it from making contact with the clamp wall.
For example, if the clamps are three meters high, the farmer should purchase a silage film that’s 5 meters high to cover the 1 meter that should go underneath and the 1 meter that should go on top (those 2 additional meters are identified in blue in the graph below).
Those who manage clamps with sloped walls generally find it much easier to handle the sidewall plastics. “Sidewall films protect the concrete panel and create a corner to prevent oxygen from affecting the top. We recommend placing a safety cover and gravel bags over the oxygen barrier film as a better long-term option for covering the silage clamp,” Wilson said.
Wilson stresses the importance of using gravel bags to secure barrier films instead of other solutions such as tires because, despite these tires, birds could still destroy the barrier plastics and ruin the silage, generating more workload as well.
Are all plastic silage films the same?
No, and this is a key point in silage clamp management because if the farmer uses a film without the recommended values for a silage clamp, it will be difficult to obtain good results with silage or, he will need to place many layers of plastic, one on top of the other, to reduce the amount of oxygen transmission to the silage, which, as we have seen, results in its deterioration.
In this case, when referring to high oxygen barrier plastic films, it is best to use only silage films that have a proven oxygen barrier rating and an oxygen transmission rate (OTR) as low as possible, typically an (OTR) of <2 cm³/m²/24 hours.
Other aspects to consider when purchasing an oxygen barrier film are the following:
- Do your best to purchase films that fit your silage clamps, and are easy to place and take off.
- Make sure the silage films can be recycled.
- Verify that the manufacturing material of the films has enough resistance and good quality that you can walk over the silage without damaging it, or creating holes that compromise the quality of the silage.
- Consider that silage films with an oxygen barrier require less plastic to cover the area since they are single-layer. This brings an implicit saving but also contributes to reducing the amount of plastic and, results in a more environmentally friendly alternative.
At Agriplastics Community we have experts on this subject, so we invite you to contact us if you need advice on acquiring oxygen barrier films or to get more information on silage clamp management.
For more information on this topic, we recommend as well listening to our podcast on oxygen barrier films.
Why are oxygen barrier films so important in silage clamp management?
When it comes to silage clamps, films with oxygen barrier properties have proven to be crucial to improve, for example, the quality of corn silage in the top layer of silo bunkers.
According to independent research by agricultural expert G. Borreani, the use of oxygen barrier films significantly improved silage quality across the entire silo front face by using HOB (high oxygen barrier) films and minimized silage damage (less than 0.6% of the silo surface compared to 5.8% of the area covered with PE plastic), especially in the corners.
“HOB films helped create a more anaerobic environment than PE films in the top layer of the silo, reduced the yeast count during storage, and increased the aerobic stability of the silage. Using HOB films ensured a longer silage shelf life after air entered the silo during consumption by retarding the growth of aerobic and anaerobic yeasts, molds, and spore-forming organisms, and also reducing their detrimental effect on the environment, so there was a better nutritional and microbiological quality of silage in the top layer of the silo.”
What should you know about emptying a clamp?
This is one of the most important processes during silage clamp management and is often forgotten or not done correctly.
Emptying the clamp is as important as filling it, because if this process is not carried out correctly, it will most likely end up compromising the integrity of the silage, thus losing a large percentage of it.
Remember that, when filling and compacting silage in the silage clamp/bunker, the idea is to eliminate as much oxygen as possible, so if there are bad practices during emptying, oxygen will be reintroduced into the silage base, thus affecting its quality.
- Ideally, the process of emptying the clamp should be done daily; here are some golden rules to do so:
- The silage face should be kept sharp, straight, and vertical to the base.
- Silage faces should be kept as narrow as possible to allow a quick silage feed-out rate (2 meters per week).
- Avoid filling a silage clamp/bunker higher than your machinery can reach to empty it.
- Use silage as quickly as possible once it has been removed from the clamp/bunker.
- Remove the covers, only on the area of the face to be cut, and cover them immediately to prevent oxygen from entering and breaking down the silage.
- Immediately remove any part of the silage that’s spoiled, as it will continue to degrade and affect the silage that is in good condition.
- Do your best to perform continuous maintenance of the machinery used for emptying the clamp/bunker.
What about safety in the management of silage clamps?
As mentioned in the previous post on designing a silo clamp/bunker, it’s essential to take safety very seriously, especially during the management of the silage clamp, because, although it may seem like a harmless task, clamps can become very unsafe if they are mishandled or if there is a bad filling or emptying process, to mention just a few aspects.
However, just as silage clamps or silo bunkers can be unsafe and, depending on the season and weather, there are not many ways to make them safer, there are always measures that can be taken to minimize risks. Here are some recommendations to ensure safety in managing a silage clamp:
- Keep children away from work areas.
- Avoid overfilling a silage clamp/bunker, as this increases the risk of vehicles tipping over when moving or filling.
- In the case of clamps that are not outdoors, stay away during the first 72 hours of filling, as this is when dangerous nitrogen dioxide gas can form in large quantities.
- If possible, use a hook or pole to stay away from the edge of the silage face when removing plastic covers.
- Make sure new staff are properly briefed and trained for the work you are assigning them, particularly the hazards of working around farm machinery and the risks of being inside a silage clamp.
- Closely supervise new staff until you are sure they are aware of everything necessary to carry out the work of managing the silage clamp.
- Stay as far away from the silage face as possible and try to take samples using specialized machinery.
Are there invisible losses during silage clamp management?
Yes, hence the importance of always checking the silage clamps or silo bunkers, as well as the silage in them, to know what variables are occurring that could be compromising the integrity of the silage.
One of these invisible losses that some farmers often overlook, because they are not visible to the naked eye in the silage, is the loss of nutrients. That is why constantly measuring what is going in and what is coming out of the silage clamp is extremely important, so it’s more feasible to ensure that everything is going as planned or if strategies need to be changed.
Likewise, you must clearly define how many tons of silage you have in your silo bunker, how many hectares you have, and the actual tonnage of what you have harvested, among other aspects, because those figures will help you carry out adequate management of the silage clamp.
What is the average lifespan of a silage clamp and how does it differ for different regions and/or crops?
According to Will Wilson, a silage clamp can easily last 20 years with good maintenance and management, which translates into a good range of time that will allow you to get the most out of your silage.
The treatment given to the silage clamp, the climate of the region where the silage is located, and whether the filling operations are carried out correctly without affecting or damaging the walls with the machinery will always influence the lifespan of the silage clamp.




![[eBook] Sustainability and water management](https://agriplasticscommunity.com/wp-content/uploads/8_550x310_ENG-440x264.png)
![[eBook Trends in Agriculture Plastics] Increasing use of biodegradable mulch](https://agriplasticscommunity.com/wp-content/uploads/550 × 310_2_ENG-150x150.png)
![[eBook Trends in Agriculture Plastics] Reducing the plastic used in the manufacture of agricultural films](https://agriplasticscommunity.com/wp-content/uploads/550 × 310_1_ENG-150x150.png)


